Hey Guys, It's me SaadMaqsood 🙋🏻♂️, No matter how much I answer but you guys keep asking me the same question and that is, how to find someone's exact location using termux🔥. I have written posts about it too, but since that's not enough in 2023, here is a fresh and new working tool that will give you an almost accurate location by using a link method. This is going to be a really educational post.📲📍
Seeker : Install in Termux
Seeker Is a fully updated tool specially made for termux that allows you to accurately locate smartphones with just a link. The tools have many options to select from so that you are not only limited to one social engineering method. The seeker gets your location as well as other information about the user like the public IP address, local IP address, OS, platform, and whatnot. You can use this information to your advantage.
The cool thing about Seeker is that Other tools and services provide IP geolocation, which is NOT accurate at all and only provides an ISP's approximate location rather than the location. Seeker works best with smartphones because it makes use of the javascript to obtain Location Permission and then grabs the Longitude and Latitude using the device's GPS Hardware. If the GPS Hardware is absent, as it might be on a laptop, Seeker falls back to IP Geolocation or searches for Cached Coordinates. The accuracy of information received is typically accurate to about 30 meters if a user accepts location permission.
The Seeker Tool is created by thewhiteh4t on GitHub, and you can check out their projects @thewhiteh4t/seeker. If you like this tool, go and send some love to thewhite4t for making this community better.
NOTE: This post is solely for educational purposes. Neither I nor this site endorse any illegal activities. If you are doing any sort of misuse of this information This site is not responsible for that. THIS SITE ONLY SUPPORTS ETHICAL HACKING.
Install Seeker in Termux :
If you're eager to get started, you can quickly install the tool by copying and pasting the command below into your Termux application.
Step1 :
Before installing any tool in termux first we will update all the Pre-installed packages in termux, so we won't face any errors while using the tool.
pkg update && pkg upgrade -y
This command will update all the preinstalled packages in termux.
Step2 :
Since this tool is stored in a GitHub repository, we need to install the git package on the termux. And with the help of git, we will Fetch Seeker In termux. Since we are gonna need cloudflared too, so we will add it to this command.
pkg install cloudflared git -y
Paste this command and wait, and the git package will be installed in no time.
Step 3:
Now we will clone the Seeker tool from the GitHub repository. Just paste the below command and press enter, and the tool will be installed in a minute.
git clone https://github.com/thewhiteh4t/seeker.git
The downloading speed totally depends upon your internet speed, so make sure be in a good internet connection.
The tool is downloaded in our termux, and we just have to run and go inside the project folder to start working with it. If you don't know about termux basic commands, then it's highly suggested that you should read this post : [Termux all Basic Command].
cd seeker
Since we want the seeker tool to get installed properly, we need to give it execute permissions. By doing this, we will allow install.sh file to execute all the commands that are required to run on termux without permission denied errors. Copy and paste this command, and you are done with the permissions part.
In order for the seeker tool to function, all necessary dependencies must be installed in this step. Don't worry, we won't install them one by one; instead, we'll just use the command below.
If it is asking, do you want to continue? Then Type Y and press Enter.
Use Seeker Tool in Termux :
If you know how to use the Zphisher tool then you can use this tool with ease, if you don't know about it then you can read the below steps to learn it. Also, keep in mind that if you restart the temux then first you need to change into the seeker directory by using the "cd seeker" command, and then you can follow the below command.
Step 1:
To Start the Seeker Tool you just have to run the bash file given in the tool, just type the below command and the tool will start running. python seeker.py

Step 2:
Now you will see the main menu of the Seeker tool. Here you will have options to select a template, and these templates are just different types of pages to create a link that will get the location for you. You can try all of them one by one and see which one suits you best. For demonstration, I will choose the number 0, this is the easiest and most basic one. This will get the job done, but if you know the basics about using Linux tools, then you can select other options too. For now, type 0 and press enter.
Step 3:
After step 2 the tool is running a local host server, and now you just have to create a tunnel from our local host to the internet. For this, we will use a single command. Firstly open a new session in your termux (to open a new session you just have to swipe from the left side of your screen to the right in the termux terminal and then click on the new session) and just copy and paste the below command.
cloudflared tunnel --url http://127.0.0.1:8080
Step 4:
The above command will start a cloudflared tunnel, and we will get a link as you can see below screenshot, just copy that link and send it to the person you want to get the location of (please don't use this for illegal purposes, you can get in big trouble).
Step 5:
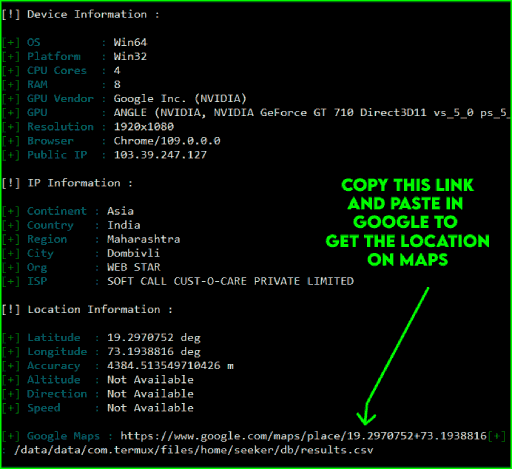
Now, Wait, when the victim will click on the link he will be prompted to allow the location and as soon as they allow the location, you will get data like it is shown in the below picture. You will get the user's location link; just copy and paste it into Chrome and see the pinpointed location. To Close the Tool, you have to Press CTRL + Capital C to Exit.
Tip: Since Chrome is flagging links when they receive data while login, these links created by any
port forwarding method won't work twice, so you can either make sure you get your data on the first try else you have to recreate the link. Or you can just tell the user to use any other browser rather than chrome or google.
Also, keep in mind that Everything in this post is only for educational purposes, so never misuse this information. Conclusion:
Seeker is the most useful Location tracking tool for termux in the year 2023
, it has all the features that a good locate tool should have. Personally, I like how many good options you have just to get the location of a user
. If you use the WhatsApp option, the chances are perfect for getting a successful click. The size of the tool is decent, and
it doesn't take up a lot of space, so you can use it in 2023 for sure
. This Post is for Education purposes, please don't try to do any childish activity because everything is easily trackable. You can also read [
Termux tracking tools ]
. If you have any problems, comment down below, so I can help you out. Thanks for reading and as always STAY ETHICAL👾.


![Ultimate Guide to Install and Use NMAP in Termux [Step-by-Step]](https://blogger.googleusercontent.com/img/a/AVvXsEjxG0wZHAK_DxFgmFpmEDnDRsp4VfCUo4d4bplWv8ue7H6biObBqw76N0orTOX-05knpMKHxbaph30nYGnkRqlS1G4HZHWhGemZKR2q1nQPIcF43ZB-Gme3uFUmKnzLKfXzcAy4ufzcmMTqO2U6A7icbW0N--P8Cd6kGJDwbwJBQ5cRnOuTuUEU187vdqrs=w100)
.png)


3 Comments
It's working good ☺️...
ReplyDeleteTHANKS
What is the size of the pkg of this tool?
ReplyDelete10 MB
Delete